Table of content
- Description
- Beginning of work
- Calculation schemes
- Clearing the database of test data
- Models and templates
- Choose of models
- Choosing and creating templates
- Profile systems
- Price calculation
- Fillings
- Hardware
- Entering price lists for products
- Product and order parameters
- Additional components and accessories
- Installation
- Other settings
- Testing
- Copy the database to other workplaces
Description
The Windows-Doors program is designed to easily and quickly calculate and estimate the cost of the order for window, door and other constructions. Windows-Doors automatically generates all required documents, which can be edited: the contract, the annex to the contract with sketches of products, the offer, the production order, and the list of materials.
Windows-Doors consists of two parts: Dealer and Configurator. Dealer - to work with orders, Configurator - to set up the database for Dealer. Because they have different functions: setting up, entering prices, margins - and work on orders estimating.
This document describes how to work with Windows-Doors Configurator.
The Windows-Doors Configurator program is intended for setting the database of the Windows-Doors Dealer program. The setting have a several stages:
- Product price calculation
- Calculation of the cost of accessories and additional equipment
- Calculation of the cost of work
- Markups
- Checking the correctness of the estimating.
Beginning of work
What data do You have for a products estimating? The choice of the calculation scheme depends on this.
If you are a seller (dealer), your manufacturer can provide price lists for products as a table (the first row has the ranges of product widths, the first column – has the ranges of product heights, between them – prices). Then you should use the calculation scheme "by price lists for finished products", or "by single-sash products". Or the "by product area" scheme, if your manufacturer provides prices by area. If your manufacturer does not provide prices and calculates products for you each time, you can choose the "no calculation" scheme.
If you produce the windows yourself, then you know the price of components and then you can use the scheme "by sets components set," with/without detailing for a profile.
Recommended data entry sequence:
- Select the calculation scheme.
- Select the currency that will be used in the program.
- Clear the database of test data (optional).
- Select the models and templates which you want to use.
- Add your profiles to the profiles list.
- Further steps depends of the calculation scheme:
- For price-lists for finished products, link each template to a profile via the price-list.
- For price-lists for sashes, you need to do the same, only for single-sash products
- For the calculation scheme "by square" enter the squares ranges for each template and profile, similar to price lists.
- For the calculation scheme "by components set", you need to enter data on profiles, filling and accessories.
- Enter an additional settings:
- margins for the profile coloring;
- margins for the changing one glass in glazing;
- margins for the changing a glazing (only for calculation by price-lists);
- cost of lifting to the one floor;
- price of anti-mosquito grid;
- General margins for finished products and for the entire order (if necessary);
- Enter prices for components: window sills, drain, slopes, and other. Enter the formulas for automatic charge calculation and the montage cost (optional).
- Set up the montage cost and montage options.
- Check the correctness of the calculation in the Window-Door Dealer Program
Calculation schemes
Menu ‘File’ -> ‘Settings’, tab ‘Calculation schemes’.
Note for calculating ‘by price-lists’: if the option to round the price to the nearest larger size is not selected, the program calculates the price of the product in proportion to the 'distance’ to the nearest size.
Clearing the database of test data
Menu ‘File’ - ‘Settings’, tab ‘database cleanup’.
Here you can set the deletion of:
- templates
- profiles, fillings and hardwares
- accessories
- customer information and orders
We do not recommend deleting templates! Just uncheck models in model selection mode (see below).
In any case, you can delete information about customers and orders that are in the demo version.
After deleting the data, the program will restart.
Models and templates
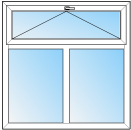
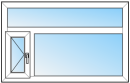
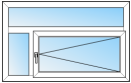
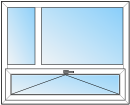
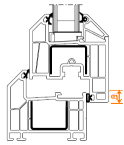
The model defines the structure of the carcass: the frames and imposts.
The template defines the parameters of the sash inside the frames spaces. Template is based on the model.
The product (in the Windows-Doors Dealer program) is drawn based on a template. The final product can be significantly changed (see examples). You do not need to create templates with different positions of the opening sash. Sash can be moved inside a window carcass (in the Window-Door Dealer).
| Model | Template | Product |
|---|---|---|
 |
 |
|
Choose of models
In the 'Models' menu, check a 'selection mode' and uncheck the models that you won't use. When you are done, uncheck 'selection mode' again to exit models selection mode.
Choosing and creating templates
As a rule, the program already has all the necessary templates created based on models. However, you can edit, delete, and add templates.
Delete a template: select the template with the left mouse button and press the "Delete" key on the keyboard.
Create a new template: select the model without a children (not a group of models) and click on the image with the "+" sign in the templates area (it first element). The new template will be added and available for editing.
Edit template: double-click the template. Set the opening and tilting of the sash in the table below the template image or via the context menu on the image.
Profile systems
Menu "References" - "Profile systems".
For the calculation scheme 'by price-list', just enter the list of used profiles.
Profile list
Delete a profile. Click on the gray box to the left of the profiles name. The field will become highlighted. Press "Delete" key on the keyboard and confirm the deletion.
Edit a profile. Click on the selected line (or press F2).
Add a new profile. Click on the last line with an asterisk (*) on the left. Enter the profile name and press Enter.
Setting the price calculation by a different profile
In the calculation scheme 'by price-lists', it happens that products from different profiles differ in price from each other by a coefficient. You can enter this coefficient on the 'Calculation price' tab: select a profile in the list box and type the coefficient.
Other profile parameters (as well as fillings and hardwares) are entered for calculation schemes 'by components set'. If you use schemes 'by price-lists', go to entering prices.
Profile setting
Profile parameters can be entered either by subtracted sizes or by dimensions (depending on what you have).
Note: some profiles (for example, Brusbox) are correctly calculated only by subtractible sizes. If you enter their dimensions, the length of the blanks of the mullions and the size of glazing may be computed incorrectly.
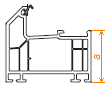
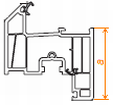
Profile parameters 'by dimension'
- Frame width, mm
- Mullion width, mm
- Sash width, mm
- Overlapping, mm
- The distance between the glazing and the frame, sash or mullion, mm
- Additional size for welding, mm
- Minus for mullion reinforcement, mm
- Minus for frame reinforcement, mm
- Minus for sash reinforcement, mm
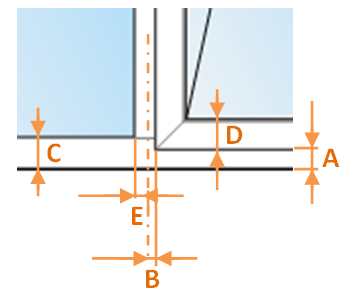
Points 1, 2 and 3. By profile widths, means the width to the glazing (distance "a" in the figure)
 |
 |
 |
Point 4. Overlap of the sash on the frame - how many mm the sash covers upon the frame.
Point 5. Distance between a glazing and any profile (frame, sash, impost). As a rule, this is 5 mm.
Point 6. Additional size for soldering on both ends (for example, 3 mm on each side, so you need to write down 6 mm)
Points 7, 8 and 9. Type how much the reinforcing profile is shorter than the blank PVC profile for the frame, sash and mullion.
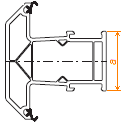
Profile parameters "by deductible sizes"
List of parameters:
- billet frames, add the size, for a welding, mm
- sash billet, deduction from the frames side, mm ('A' size in the figure)
- sash billet, deduction from the mullion side, mm (from a center of mullion, 'B' size)
- billet of a mullion, deduction from the product dimension, mm (double 'C' size)
- reinforcement of the frame, less than a billet size, mm
- reinforcement of the sash, less than a billet size, mm
- reinforcement of the mullion, less than a billet size, mm
- glazing of the sash, less than the dimensions of the sash, mm (double 'D' size)
- glazing of the closed sash, deduction from the frames side, mm ('C' size)
- glazing of the closed sash, deduction from the mullions side, mm ('E' size)
 |
Setting profile prices
Prices for the profile are set in a calculating scheme ‘by components set’. The ‘with detailed by profile’ scheme has its own differences.
Scheme “by components set”
To set prices for profiles, go to the "Prices" tab.
The tab is divided into 2 parts. On the left, you can check the profile assignments: door, window, and balcony. When you check lines appear on the right for entering prices for frame, mullion, and sash profiles. Prices are entered per 1 meter. The price includes a combination of: PVC profile, reinforcement profile, glazing beads and gaskets. For mullions, you can add the price of a couple mullions connectors. Enter price for each row.
Scheme 'by components set with detalization by profile'
It is different: at first you need to enter (import) all the necessary components of the profile (in the 'Additional components and accessories' window), then combine them into a set from which the products will be assembled.
Price calculation
For calculation schemes ‘by price-lists’, you can calculate a product cost by a different profile with a margin.
For schemes ‘by components set’, you can enter the cost of work on 1 weld and the percentage for cuts (as a part of a product total cost).
Fillings
If You use the calculation scheme "by price lists", skip this section.
Menu 'References' - 'Fillings'
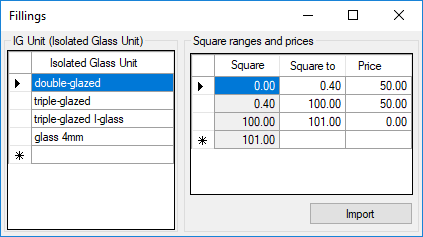
On the left side is a list of fillings, on the right side - the prices on them, which can be entered by range of the square (usually a glazing of a smaller size, in terms of 1m2 is worth more than 1m2 a large glazing).
Editing the list of the fillings is no different from editing the list of profiles.
Entering prices for a fillings
If the price for filling depends on the area, then enter several lines with ranges of squares ("square from" is copied from the previous line), otherwise - just one line where the “To” field contains a square that is obviously larger than the size of a real glazing, for example, 100 sq. m.
Import from Excel. Lists with squares and prices can be imported from Excel. Select two columns and the some number of rows with the data in the Excel sheet, go to the program and click the "Import" button.
Hardware
If You use the calculation scheme "by price lists", skip this section.
Menu item "References" - "Hardware".
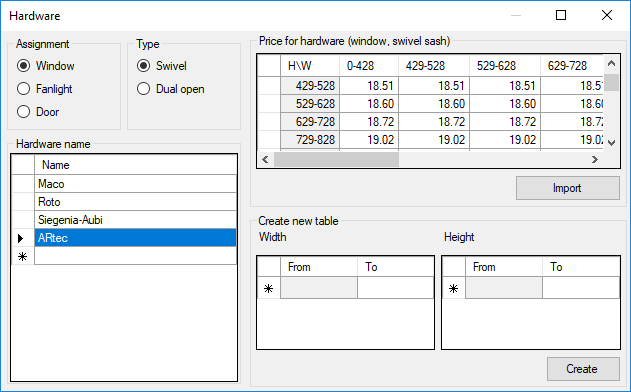
Prices for a set of hardware are entered for each assignments, opening type and brand.
In the left part of the form, you can set the assignments, type of opening, and the hardware brand.
Editing the list of hardware brands is exactly the same as editing the list of profiles.
Editing prices for a set of hardwares
There are two ways to enter the price list: manually and import from Excel.
Import prices from Excel
First, select the assignment, type of opening and the brand. Then select the required number of rows and columns containing data (including dimensions) on the active Excel sheet, go to the program and click "Import".
Entering data manually
You may need to enter data manually in two cases:
- if the price for a set of accessories does not depend on the size of the sash (you only need to enter one price)
- if there is no import possible.
If you need to enter only one price, then in the "Create a new table" section, click the "Create" button, without specifying widths and heights. In the price list editing section, a single cell will appear with the headings "Any width" and "any height". Enter the price for the kit and press Enter.
To enter the price table, enter the width and height of the sash in the "Create a new table" section. You only need to enter the "To" size, the "From" size is set automatically. Click the "Create" button. In the price list editing section, you will see a table where you can enter prices.
Entering price lists for products
If You use the calculation scheme 'by components set' then skip this section.
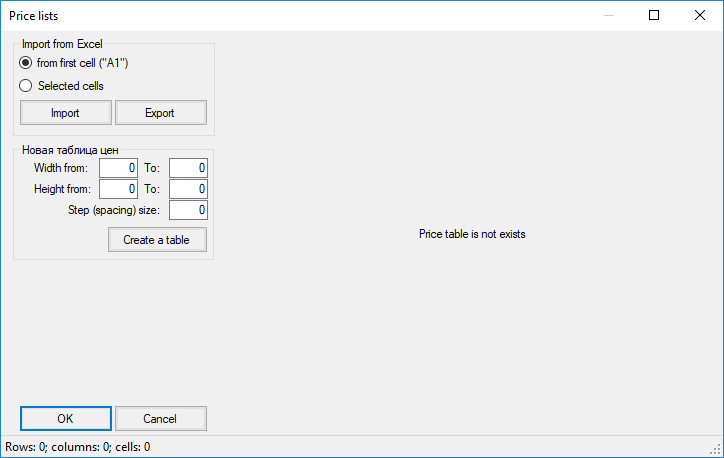
After you have edited the list of profiles, You can start entering price lists. In the main application window, select a template, profile system, and click to open the prices entry window (as shown in the figure). You can also open it by double-clicking on the required profile in the list of profiles.
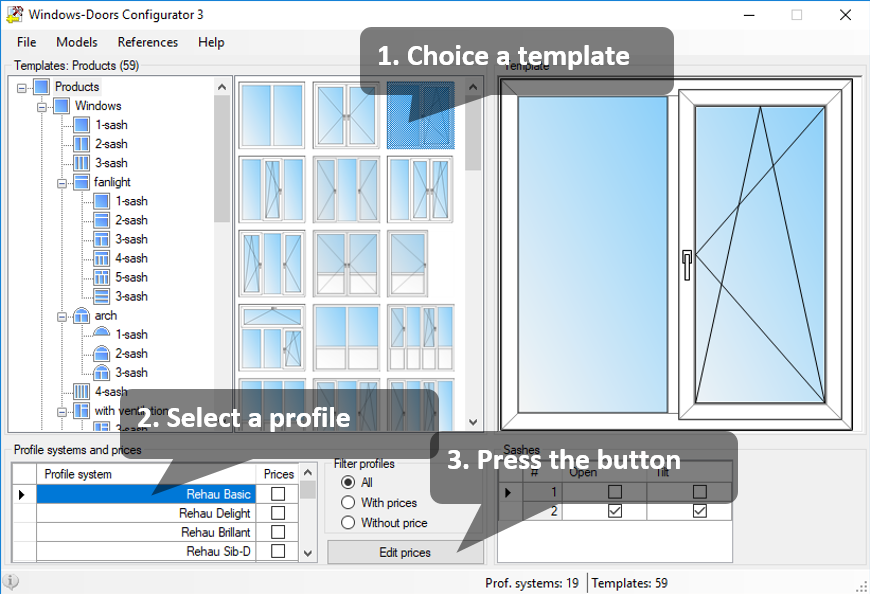
An empty "Prices" form opens.
If you have price lists in Excel, you can import them into the program (import does not work in Excel Starter Edition). Otherwise, you will have to enter the price lists manually.
Import from Excel
There are two import options: from the first cell of the sheet or selected cells. If the price list table starts from the first cell of the Excel sheet, select the first option. Else, select the table with the prices in Excel, including the headers with the product dimensions, go back to the program and click "Import".
The program imports the table.
Note: the table can contain only one dimension ("1000") or ranges ("1001-10050") in the sizes row and column. In this case, the program imports the first digit of the size from the range. The table must not contain hidden columns or rows, otherwise the import will not be correct. If there are hidden rows or columns, please make the table without hidden cells.\
Export to Excel
Click the 'Export' button to export the table to a new sheet in an open Excel workbook.
Entering the price table manually
Set the minimum and maximum dimensions for the width and height, and the size's increment. Click the "Create table" button. Enter prices manually.
After filling the table, click the OK button at the bottom of the form. The program will save the price list to the database.
Piece of advice. If You want to enter a price table manually with uneven size increments, create it in Excel and then import it.
Product and order parameters
Menu "References" - "Product parameters".
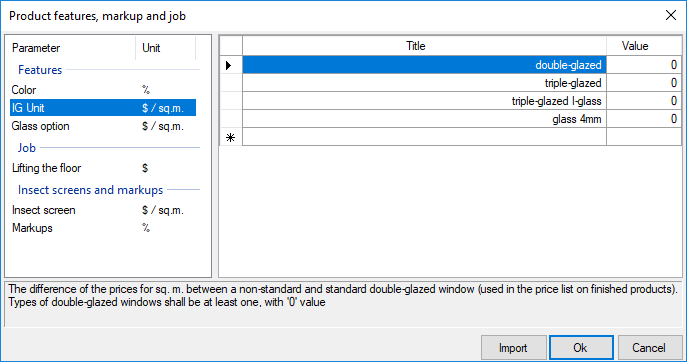
The product parameters are grouped in the left part of the form, and their values are on the right. Select a parameter on the left and edit its values on the right side of the form. Note: the rules for entering parameter values are written at the bottom of the form.
You can also import parameters from Excel. Select two columns and the required number of rows on the Excel sheet that contain the required data, go to the program and click the "Import" button.
Additional components and accessories
Menu "References" - "Additional components and accessories".
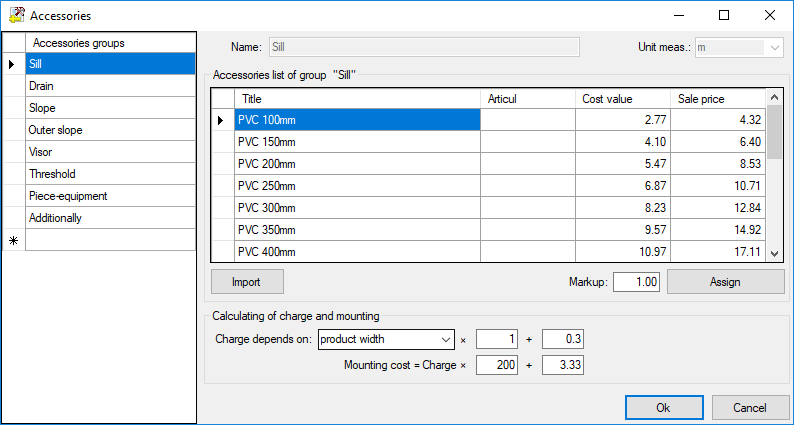
Accessories groups
The component groups are listed on the left side of the form. You can create and delete your own groups (groups that are present in the program initially cannot be deleted or edited).
Editing the names of component groups is the same as editing the list of profiles. Each group can be defined with a unit of measurement (top), a list of components (center-right), and flow rate and installation formulas
Accessories list
Enter the name and price. The article is not used in the program. The cost price is required for importing price lists if the supplier's price is specified in them. Then, after importing the price list with the cost prices, you can set the cost as follows: enter the required mark-up in the "Margin" field (for example, for "20%" you need to enter "1,2") and click "Assign". The price will be recalculated.
Deleting, adding, and editing is no different from the previous lists.
Importing a list of components
Select the required group from the list on the left. Go to Excel, select 4 columns (by the number of columns in the list of components) and the required number of rows in the price list. Go back to the program and click "Import". If the list already contains data, the program will ask you what to do: overwrite the list or add new data to the end of the list.
Flow rate calculation
For components, you can set the automatically calculated flow rate by linking it to one of the following product dimensions:
- Width
- Height
- Perimeter
- The perimeter minus width
- Area
The program takes these values from the product that the component belongs to. You can multiply by a factor or add a certain amount to this size. For example, for the calculated length of the window sill, you need to get the width of the product and add 30 centimeters to it. To do this, select the product width in the "Flow rate depends on:" list box, write "1" in the "multiplier" field ("*"), and write "0.3" in the "Summand" field ("+") (the summand is set in meters).
Calculation of the cost of installation of components
Let's say that the installation of some components costs 30 USD per meter. Plus, independently of the length, installation costs an additional 20 USD. Enter in calculation of installation: in the Multiplier field (*) - 30, and in the Summand (+) field, write 20 (the summand is set in the current currency).
If You do not want to calculate the installation of components, just put 0 in these fields.
Installation
Menu "References" - "Installation"
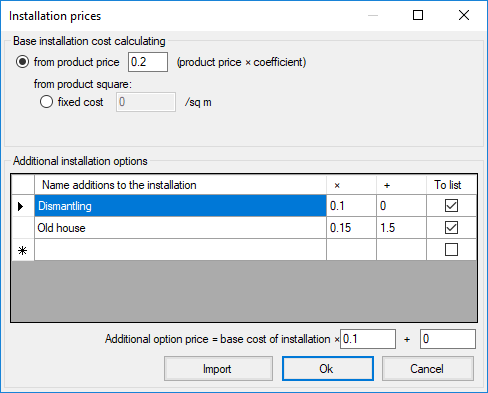
Installation of the product can be calculated: as a % of the product price, or a fixed price for 1 sq. m.
Additional options for installation
For a more accurate determination of the cost of installation, you can use the installation options (for installation in various types of buildings). When an order estimating is made, you can select one or several options at once.
The cost of the option is calculated as a coefficient to the base cost of installation and a surcharge that does not depend on the base cost. If option in list is checked then means that this option will be displayed in the list in the Window-Door Dealer program.
Import a list of options. You can import a list of options from an Excel file. Select three columns on the open Excel sheet, the required number of rows, go to the program and click "Import".
Other settings
Other program settings include currencies and units of measurement. Most often, there are no need to edit them
Program currency
Menu "References" - "Currencies"
Here you can add your own currency and select the currency to be used in the program in the list box at the bottom of the form. Adding a currency is the same as in any list. When you select a currency, the currency-dependent units of measurement are automatically updated.
Unit
Menu "References" - "Units of measurement"
There are lists of all the units of measurement used in the program. You probably don't need to edit them.
Testing
The program setup is completed. Open the Windows-Doors Dealer program And check the correctness of the products estimating includes accessories and installation.
After testing, the program is fully ready to work and estimate orders.
Copy the database to other workplaces
After setting up and testing, you can copy the database to the sales managers workplaces. After the first setup, your database does not contain orders.
On the main computer
- Go to the menu "File" - "Settings" of the Window-Door Dealer program. The settings form opens.
- Go to the "Database" tab. The Path field specifies the path to the wd.mdb database. Click the '...' button on the right to open the folder containing the program's database - wd.mdb
- Copy the database to any media.
At a remote workplace
If you don't want to save the order and customer data, do the following:
- Open the Windows-Doors Dealer program.
- Go to the menu File - Settings of the Window-Door Dealer program. The Settings form opens.
- Go to the Database tab. Click the '...' button on the right to open the folder containing the program's database - wd.mdb
- Replace the file there with the one you copied from the main computer.
If you want to save the orders and customers data, do the following:
- Open the Windows-Doors Dealer program.
- Open the order archive (Ctrl+O or menu File -> ‘Order Archive’).
- On the toolbar, click the 'Save to file' button. Enter the file name and click the Save button. Close the order archive.
- Go to the menu File -> Settings of the Window-Door Dealer program. The settings form opens.
- Go to the Database tab. Click the '...' button on the right to open the folder containing the program's database - wd.mdb.
- Close the Windows-Doors Dealer Program
- Replace the wd.mdb file in the open folder with the one you copied from the main computer.
- Open the Windows-Doors Dealer program.
- Open the order archive (Ctrl+O or menu File -> 'Order Archive').
- On the toolbar, click the 'Load from file' button. Select the file with the order archive (where you saved your orders in step 3) and click the Open button. All orders will be loaded to the database, and existing orders (brought in the new database) will be overwritten.
There are all new data was copied, orders are stored.
I hope you are glad to work in our program!
If You have any questions about the program write to info@windoorsoft.com
Sincerely, Alexey Kanishchev, developer of the Windows-Doors program info@windoorsoft.com.